Pi-hole with DNSCrypt-Proxy and Quad9
Motivation
So far I've been very happy with my setup of Pi-Hole and DNS upstreams from Quad9. I have rarely thought about the security of the DNS service. However, DNS is very easy to hijack and very susceptible to man-in-the-middle attacks and sniffers that can compromise privacy.
Solutions on the market
Solutions on the market
There are now several ways to make DNS a little "more secure". From DNSSEC to DoT to DoH and DNSCrypt, the possibilities are in competition and are reminiscent of the first browser wars. Ultimately, what convinced me about DNSCrypt was this comparison, which also serves as an excellent source of understanding the technical mechanisms behind it. Unfortunately, Pi-hole doesn't directly support DoT, DoH or DNSCrypt, but there is a perfect solution that at the same time preserves the "separation of concerns" pattern.

DNSCrypt-Proxy
A proxy acts like a man-in-the-middle under your control. It enables you to use classic DNS internally in your network while talking to the Internet via - in this case - DNSCrypt. If you like to dive deeper, visit the official project wiki.
I will guide you through a few steps setting up DNSCrypt-Proxy for your Pi-hole. I am using a Raspberry Pi 4 with Ubuntu 20.10. Pay attention to details that may differ for your operating system. Use superuser/root or sudo for all the following steps.Get binary and exctract
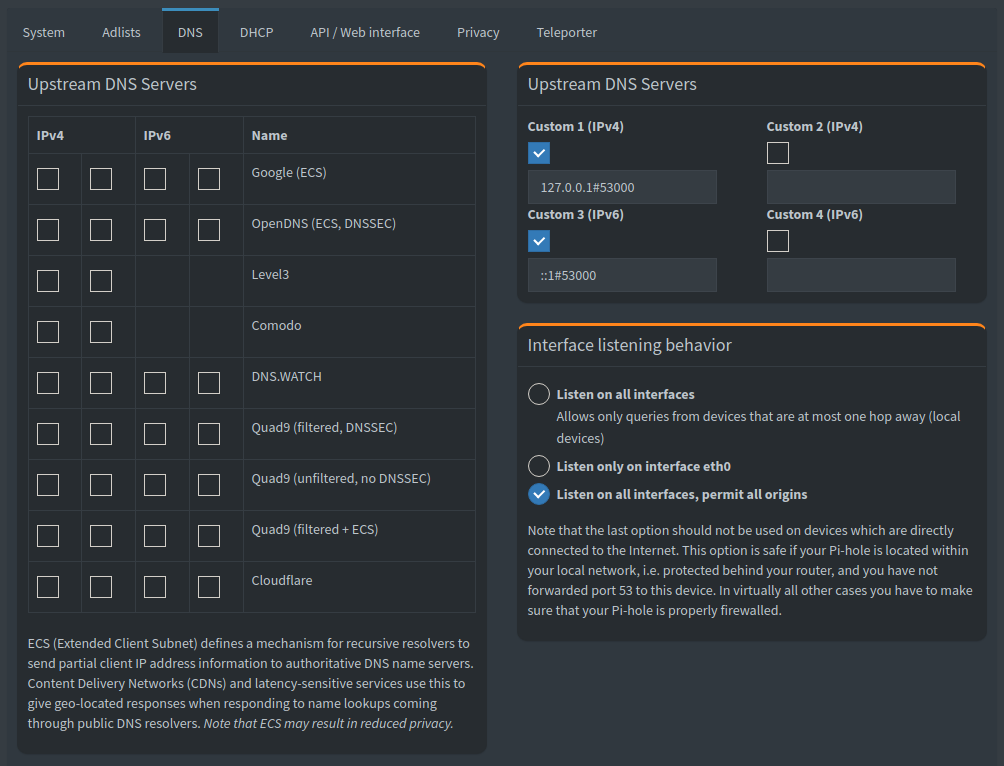 All we have to setup in Pi-hole is the upstream DNS server in the configuration interface. Navigate to Settings > Tab DNS and configure a custom upstream DNS server that points to the DNSCrypt-Proxy on localhost (127.0.0.1#53000 for IPv4 and ::1#53000 for IPv6). Important: disable all other upstream DNS servers.
Make sure to disable DNSSEC validation in Pi-hole, DNSCrypt-Proxy already validates the responses. Otherwise you will double-check DNS queries and increase the round-trip time significantly.
Get binary and exctract
We are getting the latest binary from here: https://github.com/DNSCrypt/dnscrypt-proxy/releases/latest. For our Raspberry Pi 4 we have to use ARM64 architecture.
$ cd /opt
$ wget https://github.com/DNSCrypt/dnscrypt-proxy/releases/download/2.0.45/dnscrypt-proxy-linux_arm64-2.0.45.tar.gz
$ tar -xzvf dnscrypt-proxy-linux_arm64-2.0.45.tar.gz
$ rm dnscrypt-proxy-linux_arm64-2.0.45.tar.gz
$ mv linux-arm64 dnscrypt-proxy
$ cd dnscrypt-proxy
Create user
Running a service as root is never a good idea. So let's create a user for running the service. The username is configured in our config below.
$ useradd dnscrypt
Create configuration
$ mkdir /etc/dnscrypt-proxy
$ touch /etc/dnscrypt-proxy/dnscrypt-proxy.toml
$ chown -R dnscrypt:dnscrypt /etc/dnscrypt-proxy
Now open the created configuration file dnscrypt-proxy.toml and paste the config. Note: these are only my preferences, feel free to edit or use a completely different configuration. The config is well documented in the examples served in /opt/dnscrypt-proxy. The most important line is the listen_address: the port must not be set to 53 if using Pi-hole, which is listening itself on port 53. I am using port 53000, which is considered safe.
listen_addresses = ['127.0.0.1:53000', '[::1]:53000']

max_clients = 250

user_name = 'dnscrypt'  # system user after listening sockets have been created

#server_names = [
#  'quad9-dnscrypt-ip4-filter-pri',
#  'quad9-dnscrypt-ip6-filter-pri'
#]  # disables require_* filters

ipv4_servers = true
ipv6_servers = true
dnscrypt_servers = true
doh_servers = true

require_dnssec = true
require_nolog = true
require_nofilter = false

force_tcp = false

timeout = 5000

keepalive = 60  # keepalive for HTTP (HTTPS, HTTP/2) queries, in seconds

log_level = 0  # 0-6, default: 2 - 0 is very verbose, 6 only contains fatal errors
use_syslog = true

cert_refresh_delay = 240

fallback_resolvers = ['9.9.9.9:53', '8.8.8.8:53']
ignore_system_dns = true

netprobe_timeout = 60
netprobe_address = '9.9.9.9:53'

log_files_max_size = 10
log_files_max_age = 7
log_files_max_backups = 1

block_ipv6 = false
block_unqualified = true
block_undelegated = true
reject_ttl = 600

cache = true
cache_size = 8192  # number of maximum entries held in cache
cache_min_ttl = 3600  # cache a response for at least 3600 seconds (1 hour)
cache_max_ttl = 86400  # cache a response for at most 86400 seconds (1 day)
cache_neg_min_ttl = 60  # cache a "this doesn't exist" response at least 60 seconds (1 minute)
cache_neg_max_ttl = 600  # cache a "this doesn't exist" response at most for 600 seconds (10 minutes)

[sources]
  [sources.quad9-resolvers]
  urls = ['https://www.quad9.net/quad9-resolvers.md']
  minisign_key = 'RWQBphd2+f6eiAqBsvDZEBXBGHQBJfeG6G+wJPPKxCZMoEQYpmoysKUN'
  cache_file = 'quad9-resolvers.md'
  refresh_delay = 72
  prefix = 'quad9-'

[broken_implementations]
fragments_blocked = [
  'cisco','cisco-ipv6',
  'cisco-familyshield',
  'cisco-familyshield-ipv6',
  'cleanbrowsing-adult',
  'cleanbrowsing-adult-ipv6',
  'cleanbrowsing-family',
  'cleanbrowsing-family-ipv6',
  'cleanbrowsing-security',
  'cleanbrowsing-security-ipv6'
]
Setup service and start
Since we have now saved a configuration, we can create and start the DNSCrypt-Proxy as a system service.
$ /opt/dnscrypt-proxy/dnscrypt-proxy -config /etc/dnscrypt-proxy/dnscrypt-proxy.toml -service install
$ /opt/dnscrypt-proxy/dnscrypt-proxy -service start
The service should be now up and running. Check it via ps -ef | grep dnscrypt-proxy or service dnscrypt-proxy status. We configured to use syslog, so also have a look at /var/log/syslog.
Pi-hole
Make sure to disable DNSSEC validation in Pi-hole, DNSCrypt-Proxy already validates the responses. Otherwise you will double-check DNS queries and increase the round-trip time significantly.
Save this configuration and you are done. Happy (more secure) surfing. The Pi-hole now talks to Quad9 via the DNSCrypt-Proxy.

Comments
Post a Comment